Last updated on May 13th, 2023
There are only a few reasons why you could be looking to how to whiten teeth in Photoshop. You want to give the smile in that picture some extra sparkle, or better, remove a stain or two from the teeth. We would never know the exact reason why you are looking to do this. One thing we know though is this. There is a quick way to go about whitening teeth in Photoshop. This post will walk you through the process.
These steps are quite easy to follow. Yes, that’s right. You don’t have to be a Photoshop expert to be able to follow this process and achieve your desired goals. Are you are already a Photoshop expert? Perfect. It is a win-win situation for you. How white or not a set of teeth appears could be all the difference between a great photo and a mediocre one. Here is how to go about whitening teeth in Photoshop the quick yet effective way.
Steps to Follow How to Whiten Teeth in Photoshop Quickly
The first thing you have to do is quite obvious. You have to open the image you want to work with on Photoshop. Once that box checks, follow these steps.

-
- Begin by creating a mask. To do this, locate the Magnetic Lasso tool on the upper left side of your screen and select it. Use the tool to select and outline the teeth by tracing out the shape and edges of both the upper and lower teeth. Edges here refer to the parts in contact with the gum. Make sure to not miss out any tooth.

-
- Once done, go on to create a new group and add a new layer within that group. The options for this are by the lower right side of your screen. After doing this, select the group and create a layer mask by clicking the ‘Mask’ button.

-
- Refine the mask by clicking on the ‘Select and mask’ button. This would highlight the outlined teeth and place it against a black background. That way, it is easier for you to focus on what you are working with while feathering.

-
- Feather the edges of the teeth by dragging the ‘Feather’ slider rightward and increasing its value from 0.0p to about 1.7p. Click the ‘Ok’ button when finished.

-
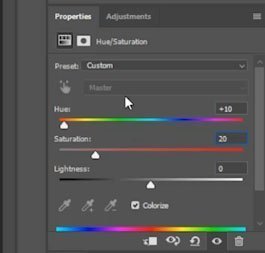
- Once you are finished feathering the edges, click on the ‘Adjustment layers’ option. From the list of options shown, select ‘Hue/Saturation’.

-
- Tick the ‘Colorize’ box to colorize the teeth.

-
- Enter the values ‘10’ for Hue and ‘20’ for saturation. This would take the teeth from yellow to white instantly!

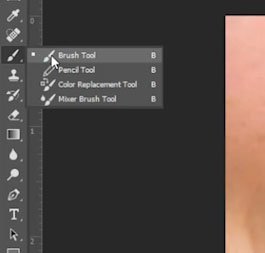
- As there might still be some yellow in the gaps between teeth, your work is not yet done. Fix this by selecting the Brush tool located on the right side of the screen. Then, click on the ‘Mask’ again and use the brush to paint wherever you see yellow.
- Voila! The teeth are now as white as white can be
With the methods outlined above on how to whiten teeth in photoshop, you will transform and whiten any set of teeth in good time. What’s more, the whitening would not mess up the original image in any way. If there is any teeth whitening method that needs to be in your Photoshop arsenal, it is this one. Get right to it now!


